
The orders list
Your day's deliveries as a table — choosing columns, searching, tagging, changing fulfilment status, and sending a batch to print.
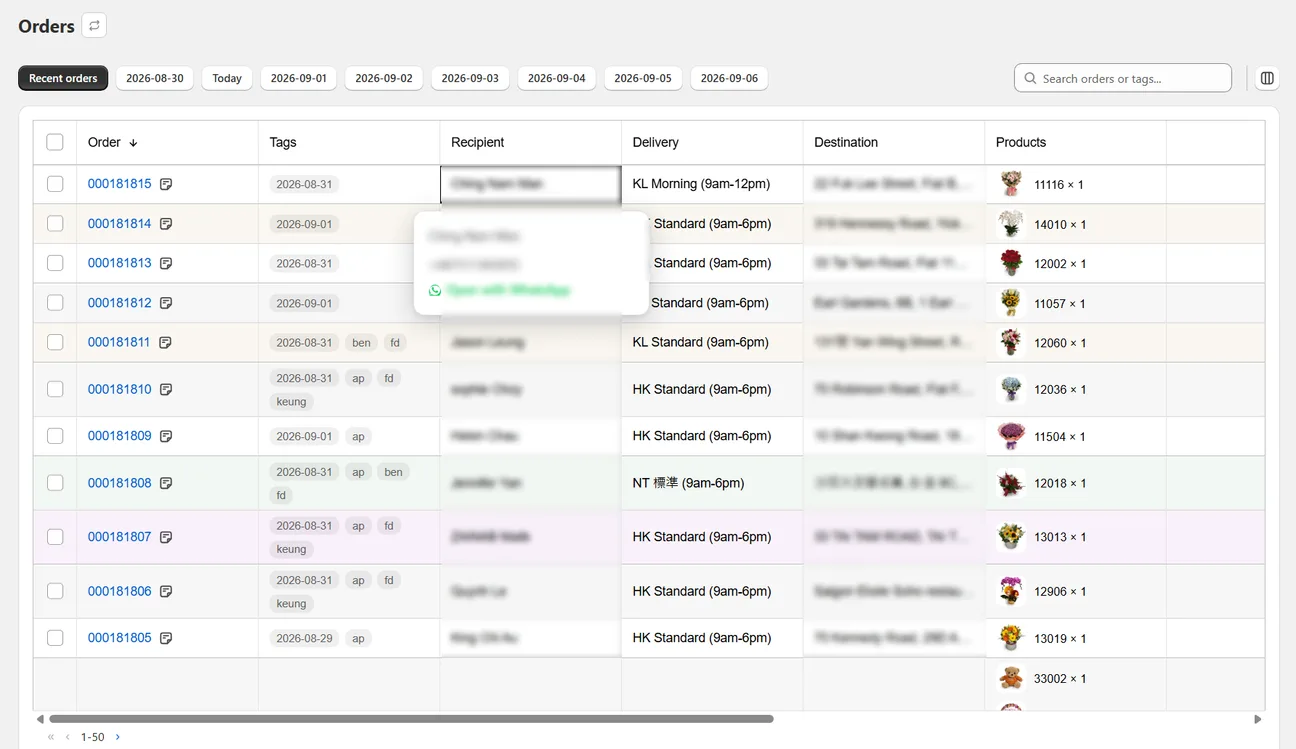
The Orders page is the working table. It shows the same orders as your Shopify admin, arranged for delivery work rather than for accounting.
Picking a day
Use the date chips at the top, exactly as on the dashboard. The table shows that day’s deliveries.
The search box matches a whole tag or an order number. Order numbers work with or without leading zeros and with or without #. Searching a number looks beyond the selected day so you can find an order without knowing its date.
Choosing columns
The columns control sits at the right of the filters. Columns are grouped:
- General — order number, tags, dates, customer
- Order details — total, payment status, fulfilment status, products
- Delivery — recipient, recipient phone, delivery method, destination
- Integrations — delivery date, time, method and note, read from your checkout app
- Wunder — buyer, buyer phone, gift message
Turn on what your team needs and hide the rest. Long values — the gift message, the delivery note, the buyer’s details — show a short version in the cell and the full text in a hover panel.
Delivery date, time, method and note come from whichever checkout app your customers use, through the mapping in Settings → Integrations. They are switched off by default, and they will be blank until that mapping is set up. An empty column here usually means the mapping, not a missing order detail.
Your layout follows your Shopify login, not the store. Two people signed in to the same shop keep different layouts on purpose. When someone reports that a column "keeps disappearing", check which account they are using.
Tagging orders
Select one or more rows and use Manage tags. The dialog offers your store’s existing tags — the ones you use most appear first — and you can add new ones.
Changes are shown for confirmation before they are saved, so you can see exactly what will be added and removed across the selection before committing.
This is also how you assign a driver: add that driver’s tag. See assigning orders to drivers.
Changing fulfilment status
Select rows and use Mark as to set Fulfilled, Unfulfilled, In progress or On hold. You can also double-click a fulfilment cell to change one order without selecting it.
These write straight to Shopify, exactly as if you had made the change in the Shopify admin.
Sending orders to print
Tick the rows and press Print — or Invoice for the invoice page. The batch travels with you.
Pick a day and select every row, and the print queue means "everything for this day" — new orders arriving for that day join the run and the counter grows.
Tick a few specific rows and the batch is closed at exactly those orders. Nothing joins it, however long you wait or how often you refresh. The same applies when a search or a drill-down filter is active, or when you are partway through a long day's second page.
Both are deliberate: an operator printing five orders must not have a sixth appear mid-run. But the two look identical once you are on the print page, so it is worth knowing which one you did.
Until the table has finished loading, the app cannot tell whether your selection is the whole day or only the part fetched so far — and handing over a partial day as a fixed batch would silently print less than you meant. The buttons wait rather than guess. Let the row count settle, then press Print.
A selection is used once
Send orders to Print or Invoice and that exact batch loads once. If you leave the page, hop between Print and Invoice, click the sidebar link again, or refresh mid-run, you come back to that page's default filter rather than your selection. Re-select on the Orders page and send it again.
Opening the order in Shopify
The order number is a link to the order in your Shopify admin. By default it opens in a new tab, so you keep your place in the list. You can change that — along with whether Print and Invoice open in new tabs — in Settings → General, under Action Centre. Those choices apply to the computer you are using.
Page size
The table loads 50 orders at a time and fetches more as you go. This is fixed and there is no setting for it.
Next
Still stuck? Ask us about this page and we will answer directly.